
SATURDAY SKILL BUILDER – WEEK 1: Welcome to your new weekend ritual. Every Saturday, we tackle one essential BBQ technique that will permanently upgrade your cooking. No complex theories, no overwhelming information—just one focused skill you can master this weekend and use for life. This week: we’re starting with the foundation of all great grilling—Two-Zone Fire Setup.
Saturday Skill Builder #1: Master the Two-Zone Fire Setup
“The two-zone fire is the difference between guessing and knowing, between reacting and controlling. It’s the single most important skill in grilling because it gives you options. With two zones, you’re not at the mercy of your fire—you’re the conductor of your culinary orchestra, moving food between intense heat and gentle warmth with purpose and precision.”
Saturday Skill Builder #1: Master the Two-Zone Fire Setup
Download Your Two-Zone Fire Quick Reference - Setup Guide & Cooking Applications
🎯 THIS WEEK’S MISSION: TWO-ZONE FIRE MASTERY
Transform your grill from a single-temperature weapon to a multi-tool of precision cooking.
✅ WITH TWO-ZONE FIRE
- Perfectly seared AND fully cooked food
- No more flare-up disasters
- Cook multiple items simultaneously
- Rescue overcooking food instantly
- Professional-level control
❌ SINGLE-ZONE GRILLING
- Burnt outside, raw inside
- Constant flare-up fighting
- One temperature fits all
- No rescue options for mistakes
- Amateur results guaranteed
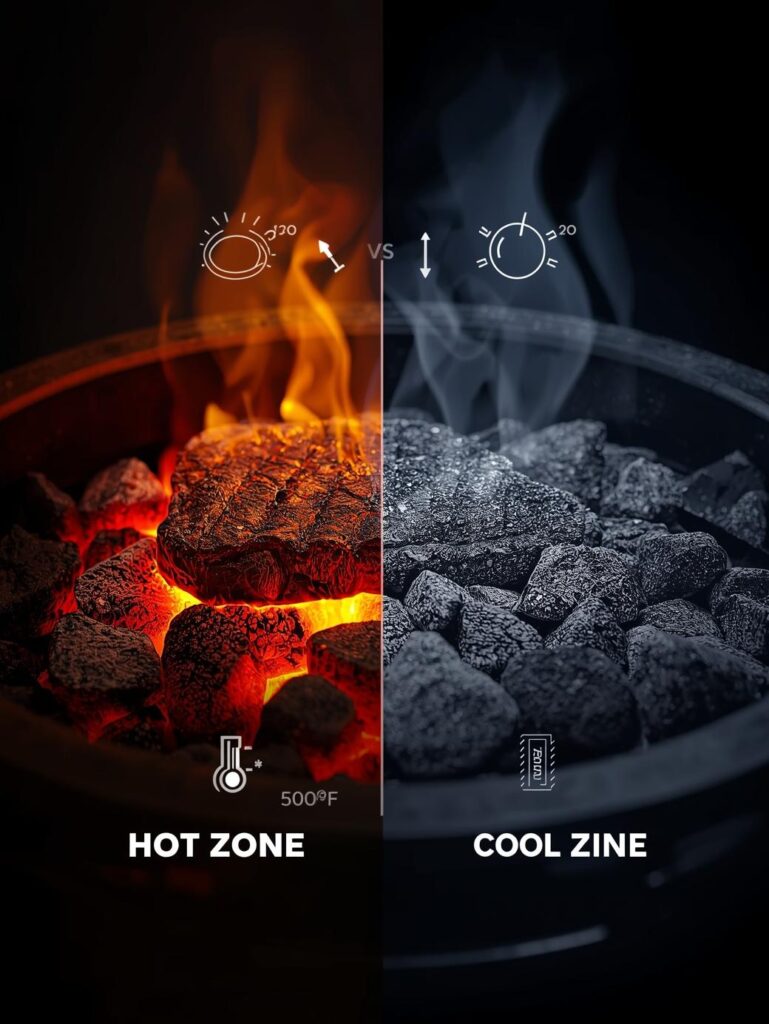
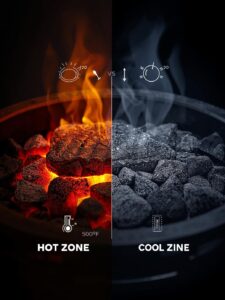
🔧 THE SETUP: YOUR 5-MINUTE GRILL TRANSFORMATION
This isn’t complicated—it’s about intentional arrangement.
🎯 Two-Zone Setup for Every Grill Type
🎯 Choose Your Grill, Master Your Fire
| Grill Type | Direct Zone Setup | Indirect Zone Setup | Temperature Difference |
|---|---|---|---|
| Charcoal Kettle | Bank coals on one side | Empty side with drip pan | 500°F+ vs 300-350°F |
| Gas Grill | Turn burners on one side to High | Turn opposite burners Off/Low | 450°F+ vs 275-325°F |
| Pellet Grill | Use sear zone or high temp | Main cooking area at lower temp | 400°F+ vs 225-275°F |
| Offset Smoker | Firebox side (hottest) | Opposite end from firebox | 300°F+ vs 225-250°F |
🔥 YOUR HANDS-ON PRACTICE SESSION
This weekend, practice with these three essential applications.
🥩 THE REVERSE SEAR
Perfect Steak Every Time
- Step 1: Cook steak in indirect zone to 115°F
- Step 2: Sear 60 seconds per side in direct zone
- Step 3: Rest – carries over to perfect 130°F
- Why it works: Even cooking throughout, then crust development
🍗 CRISPY SKIN CHICKEN
No More Burnt, Raw Chicken
- Step 1: Cook in indirect zone to 145°F internal
- Step 2: Finish skin-side down in direct zone until crispy
- Step 3: Carryover cooking brings to 165°F safely
- Why it works: Cooks through gently, then crisps skin quickly
🥓 THICK-CUT PORK CHOPS
Juicy Center, Beautiful Sear
- Step 1: Indirect zone to 125°F internal
- Step 2: Direct zone sear for caramelization
- Step 3: Rest to 140°F for perfect doneness
- Why it works: Prevents gray band, ensures juiciness
🚨 TROUBLESHOOTING: FIX COMMON TWO-ZONE MISTAKES
🎯 Solve These Problems This Weekend
| Problem | What’s Happening | Immediate Fix | Long-Term Solution |
|---|---|---|---|
| No Temperature Difference | Zones too close together | Create larger separation between zones | Use grill’s entire surface area for zones |
| Food Sticking During Sear | Grate not hot enough | Wait longer for grate to heat up | Oil the food, not the grate |
| Overcooked During Indirect | Indirect zone too hot | Move to cooler spot or reduce heat | Use thermometer to monitor zone temp |
| Uneven Cooking | Not rotating food | Rotate 180° halfway through cooking | Learn your grill’s hot spots through testing |
📝 YOUR WEEKEND PRACTICE CHECKLIST
Complete these three exercises to cement your two-zone mastery.
The 3-Part Mastery Protocol
- Exercise 1: Temperature Mapping – Place slices of white bread across your entire grill surface. Close lid for 3 minutes. Open and observe toast patterns. This reveals your grill’s true hot spots.
- Exercise 2: The Chicken Thigh Test – Cook bone-in chicken thighs starting in indirect zone until 160°F, then finish skin-side down in direct zone until crispy. This teaches zone transitioning.
- Exercise 3: The Rescue Drill – Intentionally start a steak in direct zone until one side is getting too dark. Rescue it by moving to indirect zone to finish cooking. This builds confidence.
🏆 YOU’VE NOW MASTERED: TWO-ZONE FIRE SETUP
Congratulations—you’ve just upgraded your grilling game permanently. The two-zone fire isn’t just a technique; it’s a fundamental shift in how you approach cooking with fire. You’re no longer a passive observer of your grill’s behavior—you’re the director, moving food between zones with purpose and precision.
This weekend, practice with cheap cuts. Get comfortable with the rhythm of indirect-to-direct cooking. Feel the power of having options when things don’t go perfectly. By Sunday night, this will feel natural, and you’ll wonder how you ever grilled without it.
Next Saturday: We’ll build on this foundation with “The Reverse Sear: Steak Perfection Through Temperature Control.” Master the two-zone this week, and next week’s skill will come naturally.
🔥 DEEP DIVE: TWO-ZONE MASTERY →
Explore our complete guide to two-zone fire cooking techniques
📚 SATURDAY SKILL BUILDER SERIES
Your progressive path to BBQ mastery, one weekend at a time
Two-Zone Fire
Reverse Searing
Fire Management
Temperature Control