

Expert’s Note: This guide is part of our advanced BBQ Equipment Maintenance Series. Restoration is the highest form of respect for the craft of barbecue.
GRILL RESTORATION: BRINGING OLD EQUIPMENT BACK TO LIFE
“A rusty grill isn’t trash; it’s a story waiting for its next chapter. Restoration isn’t about saving money—it’s about salvaging soul, honoring craftsmanship, and earning flavors that no new grill can provide.”
Cast Iron Care and Seasoning – Learn how to maintain restored cast iron grates
Download our free Grill Restoration Toolkit & Parts Checklist to start your project right.
There’s a special kind of magic on a curbside on trash day, or in the depths of a garage sale. It’s the sight of a forgotten, rusted, and seemingly doomed grill. Where most see a relic, a restorer sees potential. Grill restoration is more than a hobby; it’s a pilgrimage into the heart of American barbecue, a hands-on lesson in mechanical simplicity, and an incredibly rewarding journey that culminates in the world’s most satisfying steak.
The goal of restoration isn’t to create a museum piece. It’s to return a trusted cooking instrument to its former glory, often making it better than it was when new. Whether it’s a classic Weber kettle, a timeless Charbroil gas grill, or a rugged offset stick burner, the principles of revival are the same.
This ultimate guide will walk you through the entire process, from assessing a candidate to firing it up for its inaugural cook. We will cover disassembly, battling rust, sourcing parts, and the final reassembly. Prepare to get your hands dirty and create a heirloom.
🔎 PHASE ONE: THE ASSESSMENT – CHOOSING YOUR PROJECT WISELY
Not every grill is worth saving. A quick but thorough assessment will save you from a money pit.
✅ The “Green Light” Checklist – This Grill is a Go:
- Solid Frame & Cart: The overall structure is sound. Surface rust on the cart is fine, but critical supports aren’t disintegrated.
- Intact Firebox/Cookbox: The main cooking chamber has no major rust holes, especially on the bottom. Minor surface rust is expected and fixable.
- Available Parts: A quick online search reveals that burners, grates, and flavorizer bars for this model are still manufactured and sold.
- It’s Free or Very Cheap: The best projects cost little to acquire, leaving your budget for quality replacement parts.
🚫 The “Red Light” Checklist – Walk Away:
-
- Rotten Firebox: If you can poke a screwdriver through the bottom of the cookbox, it’s toast. This is the heart of the grill, and it’s often not replaceable.
Extensive Cast Aluminum Failure: Some grill bodies are cast aluminum, which can weaken and crack with age. Hairline cracks can be repaired, but large fractures are a death sentence.
- Proprietary or Obsolete Parts: If you can’t find essential parts like valves or manifolds, the project is dead on arrival.
- Heavy Collateral Damage: Evidence of a major grease fire that warped the entire body is a sign of excessive, irreparable heat damage.
🛠️ PHASE TWO: THE TEARDOWN – STRIP IT TO THE BONE
This is the most labor-intensive phase. Document everything.
⚙️ The Disassembly Protocol:
- Photograph Everything: Before you turn a single screw, take pictures from every angle. Take more photos as you disassemble. This is your visual map for reassembly.
- Get Organized: Use a multi-compartment organizer, plastic bags, and a permanent marker to label every bolt, screw, and bracket. “Left Shelf Bracket” is much better than “mystery bolt.”
- Soak Stubborn Bolts: Penetrating oil (like PB Blaster or Liquid Wrench) is your best friend. Spray any rusty nuts or bolts and let them sit for at least 15 minutes before attempting to turn them.
- Disconnect Gas Lines Carefully: For gas grills, use a proper wrench on the nut, not the tube, to avoid twisting and damaging the gas line.
🎯 What to Toss Immediately:
Some things are almost never worth cleaning. As you tear down, create a “Replace” pile for: – Worn-out or rusted-through burners – Crumbling lava rocks or ceramic briquettes – Cracked or flaking porcelain-coated grates – Deteriorated wood shelves or accents – The grease tray and foil liners (these are consumables)
Pro Tip: Wear safety glasses and gloves during teardown! Rusty metal is sharp, and decades of grease and grime can harbor bacteria. A respirator is also wise during heavy cleaning and painting.
🧼 PHASE THREE: THE DEEP CLEAN – CONQUERING RUST AND GREASE
This is where the transformation begins.
🔥 Degreasing the Firebox and Lid:
The interior is caked in carbonized grease. Your weapons of choice: – Oven Cleaner: The heavy-duty, fume-filled kind. Spray liberally, place the parts in a trash bag, seal it, and let it sit overnight. The grease will wipe off easily the next day. – Citrus-Based Degreaser: A more eco-friendly but slightly less powerful option. It may require some scrubbing with a brass wire brush to avoid damaging the porcelain. – Pressure Washer: Excellent for blasting off loose debris after a chemical soak. Never use it on a grease-filled grill you plan to keep, as it will create a monumental mess.
⚒️ Battling Rust on the Cart and Body:
For Surface Rust: – Use a wire brush attachment on a drill or angle grinder to aggressively remove all loose rust and flaking paint. – Follow up with sandpaper (80-120 grit) to smooth the surface and feather the edges of any remaining paint. – Wipe down with a degreaser (like acetone or mineral spirits) to remove all dust and oils.
For Heavy Rust/Pitting: – A knotted wire wheel on an angle grinder is the most effective tool for chewing through serious rust. – For the worst cases, a flap disc will grind the metal down to a smooth, clean surface.
✨ Cleaning Salvageable Parts:
Stainless Steel Lid & Body: Use a dedicated stainless steel cleaner and polish. Always sand or scrub with the grain to avoid unsightly swirl marks.
Cast Iron Grates: If they’re structurally sound, restore them! Soak in a vinegar/water solution, scrub with a wire brush, then re-season with oil just like a skillet.
🎨 PHASE FOUR: REFINISHING – THE ART OF PROTECTION
A proper finish doesn’t just look good; it protects your work for years to come.
🛡️ High-Temperature Paint is Non-Negotiable:
Standard spray paint will bubble and burn off instantly. You must use paint rated for at least 600°F, and 1200°F is better for areas near the firebox.
How to Apply: – Work in a well-ventilated area. – Apply several light, thin coats, following the directions on the can for flash-off times between coats. – Let the paint cure fully according to the instructions. This often involves heating the grill gradually to set the paint.
🔩 Don’t Forget the Hardware:
Replace rusty screws and bolts with new, stainless steel hardware. It’s a small cost that makes a huge difference in the final look and long-term durability.
⚙️ PHASE FIVE: REASSEMBLY – THE REBIRTH
This is the fun part, where the grill takes shape again.
📖 The Reassembly Protocol:
- Lay Out All Parts: Have your new parts (burners, grates, flavorizer bars, igniter) and cleaned old parts organized and ready.
- Follow Your Photos: Reverse your disassembly process, using your photos and labeled bags as a guide.
- Replace All Gas Components: For gas grills, never re-use the old gas hoses. Sunlight and weather degrade them internally. Install a new hose/regulator assembly. This is a critical safety step.
- Lubricate Moving Parts: Use a high-temperature grease on wheel axles and any other friction points.
🧪 The Final Tests:
1. The Leak Test: With the gas connected and the burners OFF, open the tank valve. Spray a 50/50 solution of soapy water on all gas connections—at the tank, the manifold, and where the burners connect. If you see bubbles, you have a leak. Tighten and re-test. Do not skip this.
2. The Ignition Test: Light each burner individually. Check for an even, blue flame across the entire burner. A lazy, yellow flame indicates a clog or an air shutter that needs adjustment.
3. The Temperature Test: Close the lid and let the grill pre-heat. Verify the thermometer is accurate with a standalone oven thermometer.
🎯 Grill Restoration Budget & Parts Matrix
| Component | Restoration Action | Typical Replacement Cost |
|---|---|---|
| Burner Tubes | Clean ports with a wire; if rusted through, replace. | $25 – $60 (set) |
| Cooking Grates | Restore cast iron; replace porcelain-coated or stainless rod. | $40 – $150 |
| Flavorizer Bars | Replace if heavily rusted or collapsed. | $30 – $80 (set) |
| Igniter Kit | Always replace for reliability. | $15 – $40 |
| Gas Hose/Regulator | Always replace for safety. | $25 – $50 |
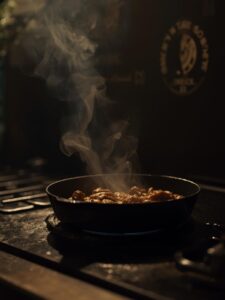
🏁 CONCLUSION: THE INAUGURAL COOK
The moment of truth. After all the sweat, grease, and patience, it’s time to christen your restored grill. Don’t start with a complex brisket. Start with something simple and celebratory—a thick, well-marbled ribeye, a few burgers, or a beer-can chicken.
As you stand over the heat, you’ll see more than just a cooking appliance. You’ll see every scrubbed bolt, every coat of paint, every moment of frustration overcome. The flavors will taste different because you earned them. You didn’t just buy a grill; you built a story.
Your mission is this: Keep your eyes open. That neglected grill on the side of the road isn’t junk; it’s an opportunity. Pick it up, roll up your sleeves, and write the next chapter. The community of restorers is waiting to welcome you.
📚 Related BBQ Topics
- Gas Grill Troubleshooting: From Ignition to Temperature Issues – Diagnose problems before you restore.
- BBQ Equipment Maintenance Series – Keep your restored grill in perfect shape.
- The Ultimate Guide to Steak Cuts – Celebrate your first cook with the perfect steak.
- Cast Iron Care and Seasoning – Learn how to maintain restored cast iron grates.
Ready to Breathe New Life into an Old Classic?
Join the restoration revolution. Save a piece of BBQ history and create a grill that is uniquely yours.